
A Laravel online store is a custom-built online sales system where the technical logic of the website is adapted to the company’s real business processes: how the catalog is structured, how customers place orders, how managers handle requests, how product data is updated, and how the website is prepared for SEO promotion.
Laravel is chosen when a ready-made CMS or website builder already limits the store’s growth. This applies to projects that need a flexible structure, clean code without unnecessary modules, high performance, convenient administration, integration with the company’s internal systems, and the ability to expand the website without rebuilding it from scratch.
At SEO-Evolution, we use Laravel as a foundation for complex commercial websites where not only design and development matter, but also search visibility, stability, analytics, and further growth. You can learn more about this area on our Laravel development page.
What is Laravel?
Laravel is a modern PHP framework for building websites and web systems with complex internal logic. It is not used as an out-of-the-box online store, but as a foundation for custom development: the team designs the data structure, website rules, admin area, user scenarios, and technical capabilities for future growth.
For an online store, this means the business is not tied to the standard modules of a ready-made CMS. With Laravel, a website can be built around a specific sales model: with custom catalog logic, convenient product management, separate rules for different customer types, cleaner code, and more precise control over the technical side of SEO.
Before starting development, we check the current framework version, PHP requirements, and support timelines. For this, official Laravel release notes are used — a page with information about new versions, technical requirements, bug fixes, and the security update period. Official Laravel release notes help avoid building a new project on an outdated technical foundation.
What should you build an online store on: Laravel, CMS, or website builder?
The platform for an online store should be chosen based on the task, not popularity. For a quick launch of a small catalog, a website builder or ready-made CMS may be enough. If the website needs to grow, work fast, support individual sales rules, and avoid dependence on dozens of plugins, Laravel gives more technical freedom.
| Solution | Pros | Cons | When to choose |
| Laravel | Flexible architecture, custom logic, convenient integration capabilities, SEO control, scalability | Higher initial cost, longer development, dependence on the quality of the technical specification and the team | Complex online store, B2B, large catalog, CRM or ERP, non-standard checkout rules, personalized pricing |
| WordPress + WooCommerce | Fast launch, many ready-made plugins, convenient content management, large specialist market | Dependence on plugins, performance and security risks if poorly assembled, difficult implementation of non-standard store logic | Small or medium-sized store where a blog, content, and quick launch are important |
| OpenCart | Ready-made logic for an online store, catalog, products, orders, payment and delivery modules | Customization limits, dependence on module quality, difficult refinement of non-standard scenarios | Standard online store with a typical catalog and clear sales logic |
| Magento / Adobe Commerce | Powerful platform for large catalogs, complex rules, and large-scale stores | High requirements for budget, server, development team, and support | Large eCommerce projects with resources for a complex platform and long-term development |
| Website builder | Fastest launch, simple management, minimal technical entry barrier | Limitations in SEO, performance, integrations, catalog structure, and functional growth | Niche testing, small storefront, sales launch without complex development |

Before choosing a platform, evaluate not only the launch but also future growth: whether it will be convenient to expand the website, change sales rules, add new sections, connect external services, and maintain normal performance without technical overload.
When does an online store need Laravel?
An online store needs Laravel when the standard logic of a ready-made platform is no longer enough. This is not about the size of the business. A small store can also have complex processes, while a large project may sometimes work with a fairly typical model. The key criterion is how much the website must adapt to your rules for sales, accounting, order processing, and growth.
This framework works well for projects that need an individual technical solution: custom catalog logic, different scenarios for customers, integration with accounting systems, flexible price management, a fast website without unnecessary modules, and the ability to gradually expand functionality.
- the website must work according to its own sales rules, not adapt to a ready-made module;
- the catalog needs a flexible structure, filters, product variations, and SEO pages;
- integration is needed with CRM, warehouse systems, payment, delivery, or ERP – a system for accounting and managing company resources;
- the project must grow without the technical limitations of a ready-made CMS.
Benefits of a Laravel online store
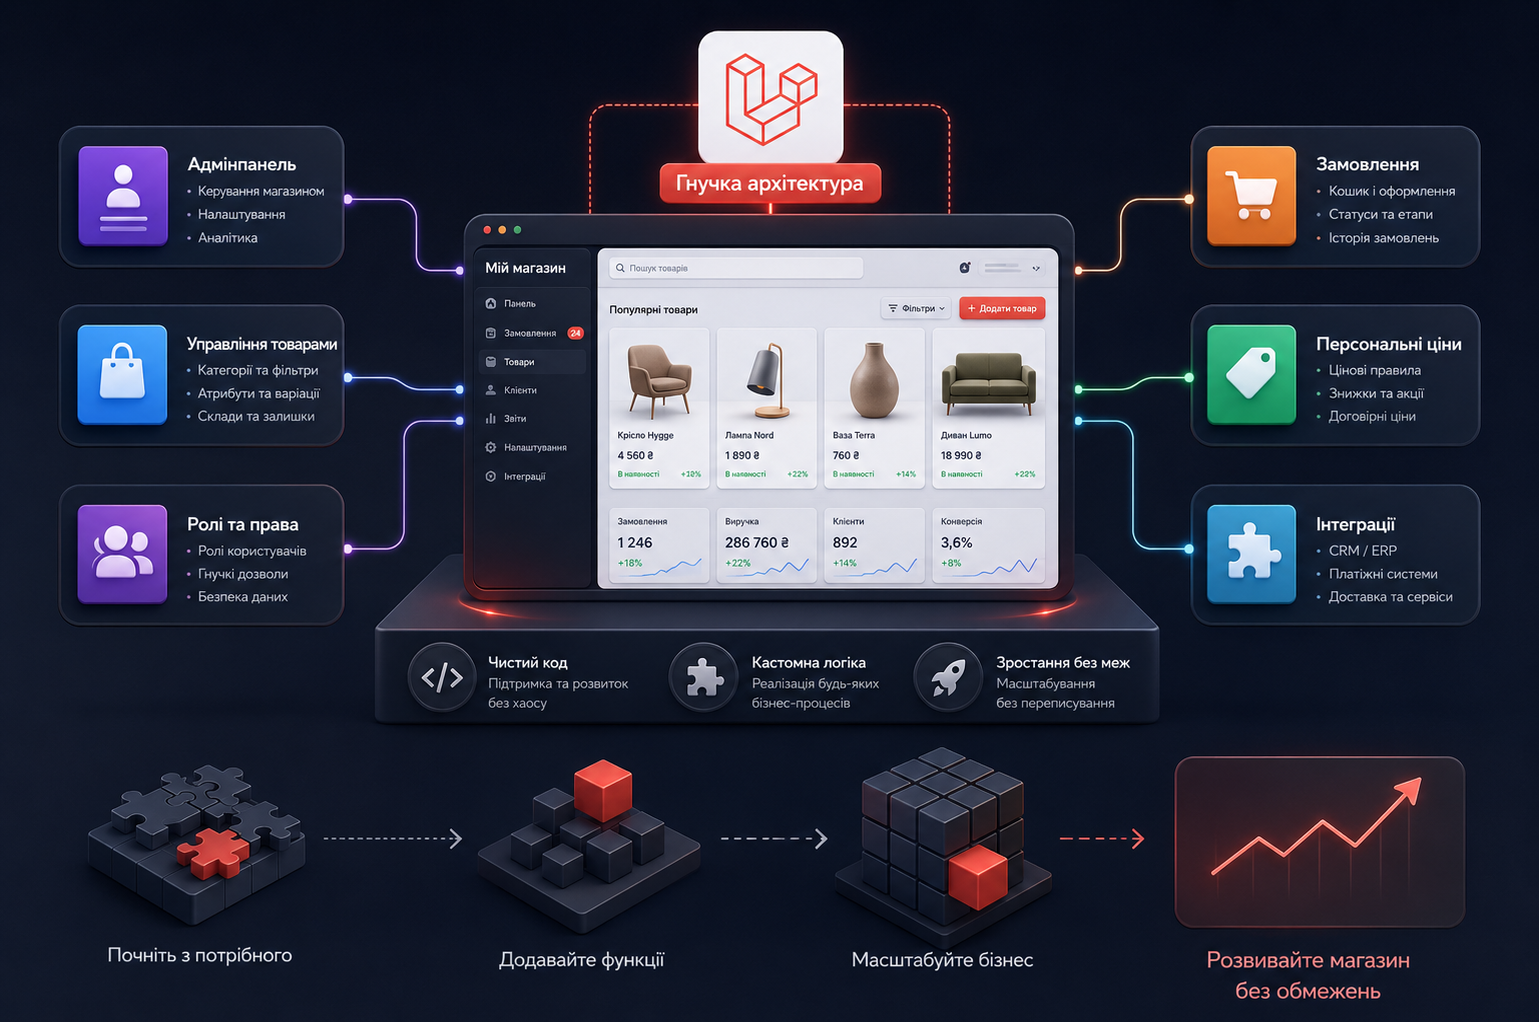
The main benefit of Laravel for an online store is control over the website’s technical logic. Developers do not assemble the project from random modules; they build a system around the specific structure of the business. This gives cleaner code, less unnecessary functionality, better manageability, and more room for future growth.
Flexible store architecture
With Laravel, the website can be designed to match the company’s processes: from product structure to order handling rules. This is useful for stores that gradually expand their assortment, add new sales channels, or work with different customer types.
Cleaner code and less excess functionality
Ready-made CMS websites often become overloaded with plugins, some of which duplicate functions or add unnecessary load. In a Laravel project, functionality is developed for the specific task, which makes it easier to control performance, security, page logic, and further support.
Convenient administration
The admin panel can be designed around the real work of managers: keeping the necessary fields, removing unnecessary elements, setting access roles, simplifying product editing, and speeding up order processing. This is an important advantage for teams that work with the catalog every day.
Growth without a complete rebuild
Laravel is well suited for phased development. After launch, new sections, services, integrations, accounts, pricing rules, or internal tools can be added without changing the entire platform from scratch.
SEO for a Laravel online store
Laravel SEO means the ability to properly implement the technical foundation for search promotion. The framework does not promote a website automatically, but it gives developers the freedom to create SEO capabilities without the limitations of ready-made modules.
What should be included in SEO when developing a Laravel online store? At the technical specification stage, it is necessary to describe not only meta tags but also indexing rules, URL structure, structured data, filter logic, page speed, and the ability to edit SEO data through the admin panel.
| SEO area | What to plan in a Laravel online store |
| URL and structure | Clean, logical URLs for categories, subcategories, products, brands, filters, and service pages |
| Meta tags | Editing Title, Description, H1, SEO texts, and metadata templates through the admin panel |
| Indexing | Management of canonical, noindex, robots.txt, sitemap.xml, pagination, and filters |
| Structured data | Product, BreadcrumbList, Organization, LocalBusiness, Review, or other schema.org types according to page content |
| Performance | Optimization of templates, caching, images, JavaScript, CSS, server response, and Core Web Vitals |
| Catalog | Control over indexable filters, sorting pages, pagination, out-of-stock products, and landing pages |
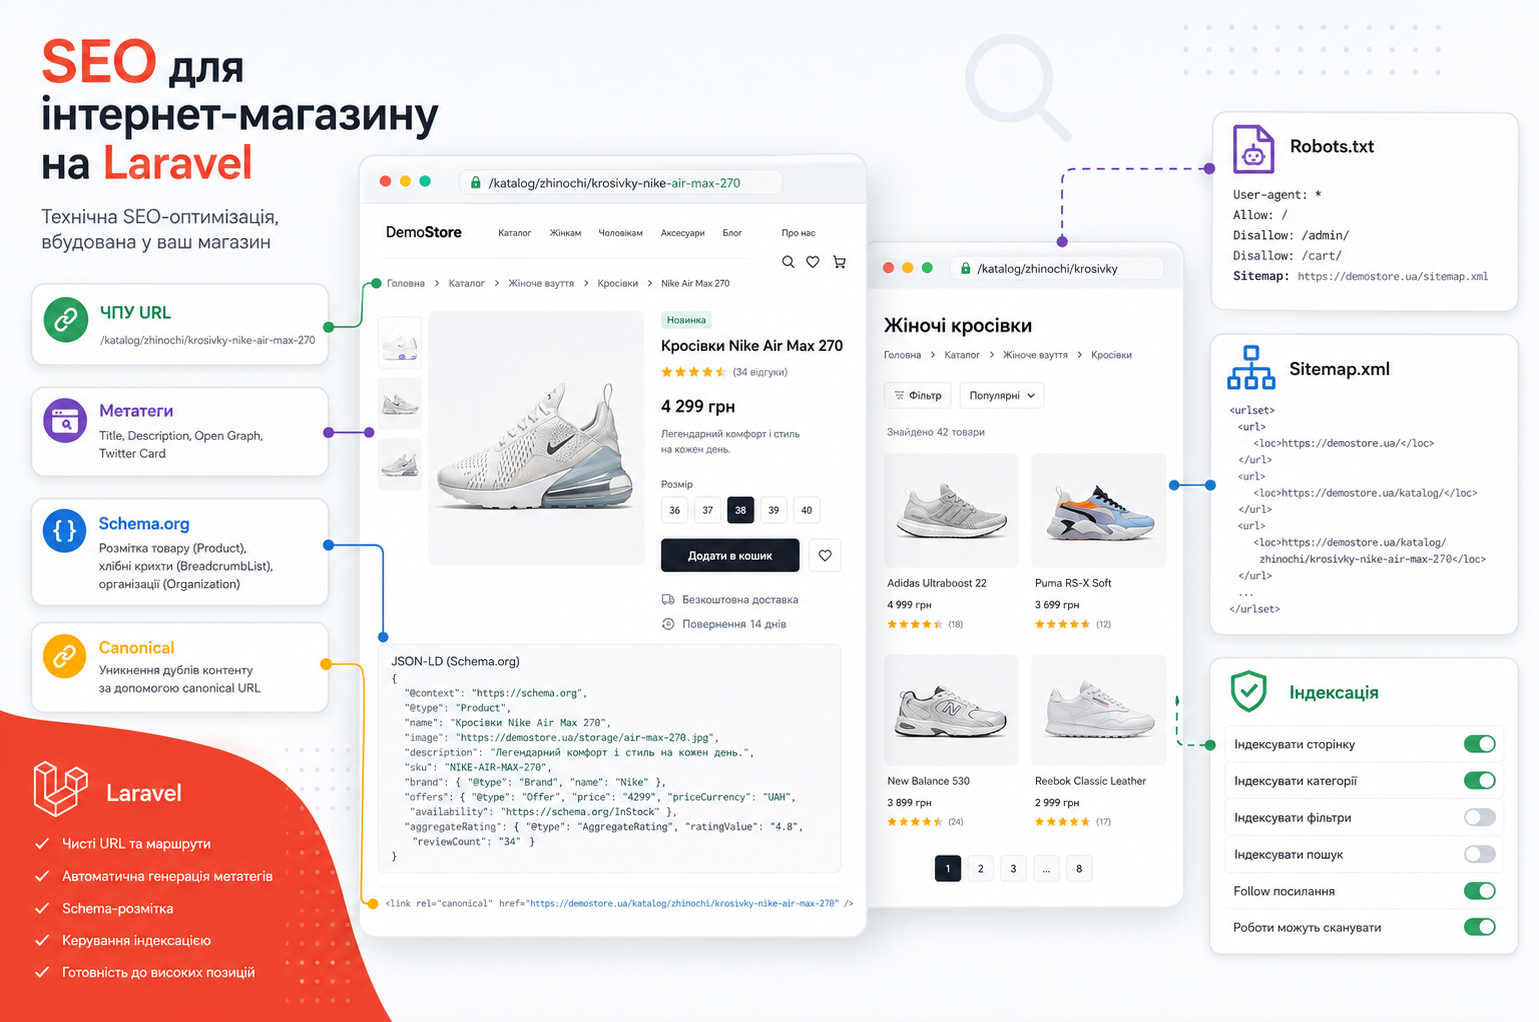
In our online store projects, we always check whether product structured data is implemented correctly. Product structured data helps search engines better understand price, availability, rating, delivery, returns, and other data on a product page. Google’s Product structured data guidelines confirm which properties should be provided for products and commercial pages.
Breadcrumbs are important for categories and nested sections. Google may use BreadcrumbList in search results to better show where a page is located within the site structure. Google’s BreadcrumbList guidelines should be taken into account for large catalogs.
The SEO-Evolution blog has a separate article about schema.org structured data . Review it before preparing a technical specification if you plan SEO promotion for an online store after launch.
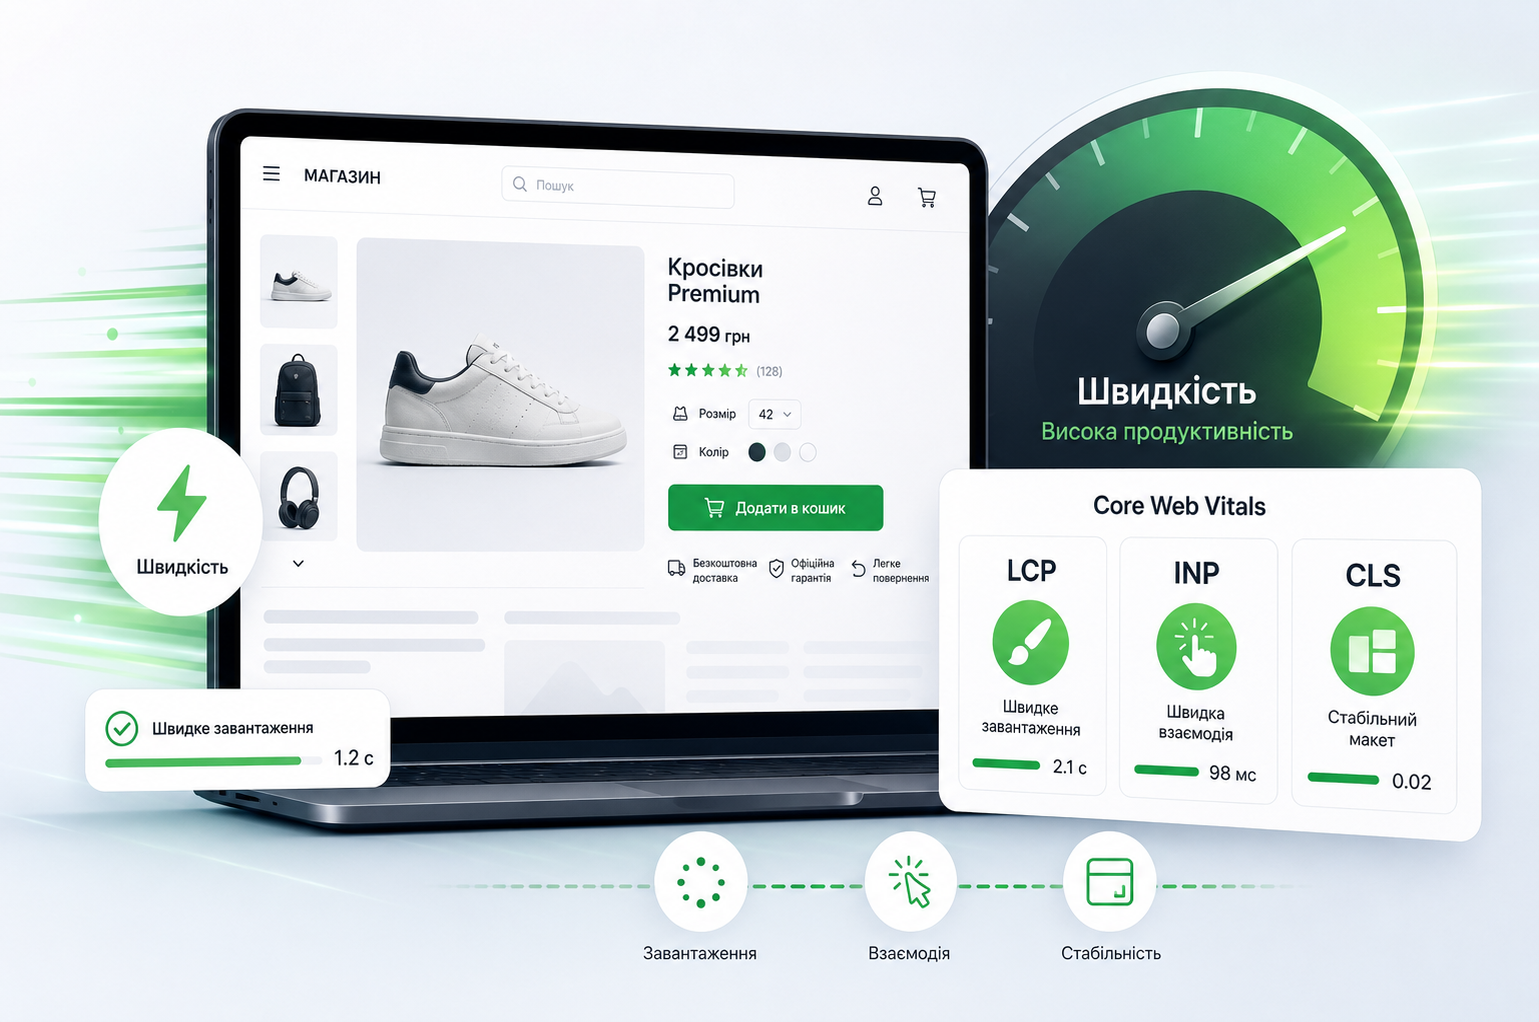
Speed and Core Web Vitals
A Laravel online store can show high performance if the project is designed properly. Unlike many CMS-based websites, Laravel does not require a large number of plugins for the store’s core logic. This makes it possible to create cleaner code, remove unnecessary load, and control page behavior more precisely.
For SEO, it is important to monitor Core Web Vitals: LCP, INP, and CLS. These metrics show how quickly the main content loads, how quickly the page responds to user actions, and whether elements shift during loading. Google Search Central explains them as indicators of real user experience.
In SEO-Evolution’s Laravel projects, performance is considered at the architecture stage: we check template structure, filter logic, image handling, caching, background tasks, and unnecessary scripts that may slow down the catalog or product pages.
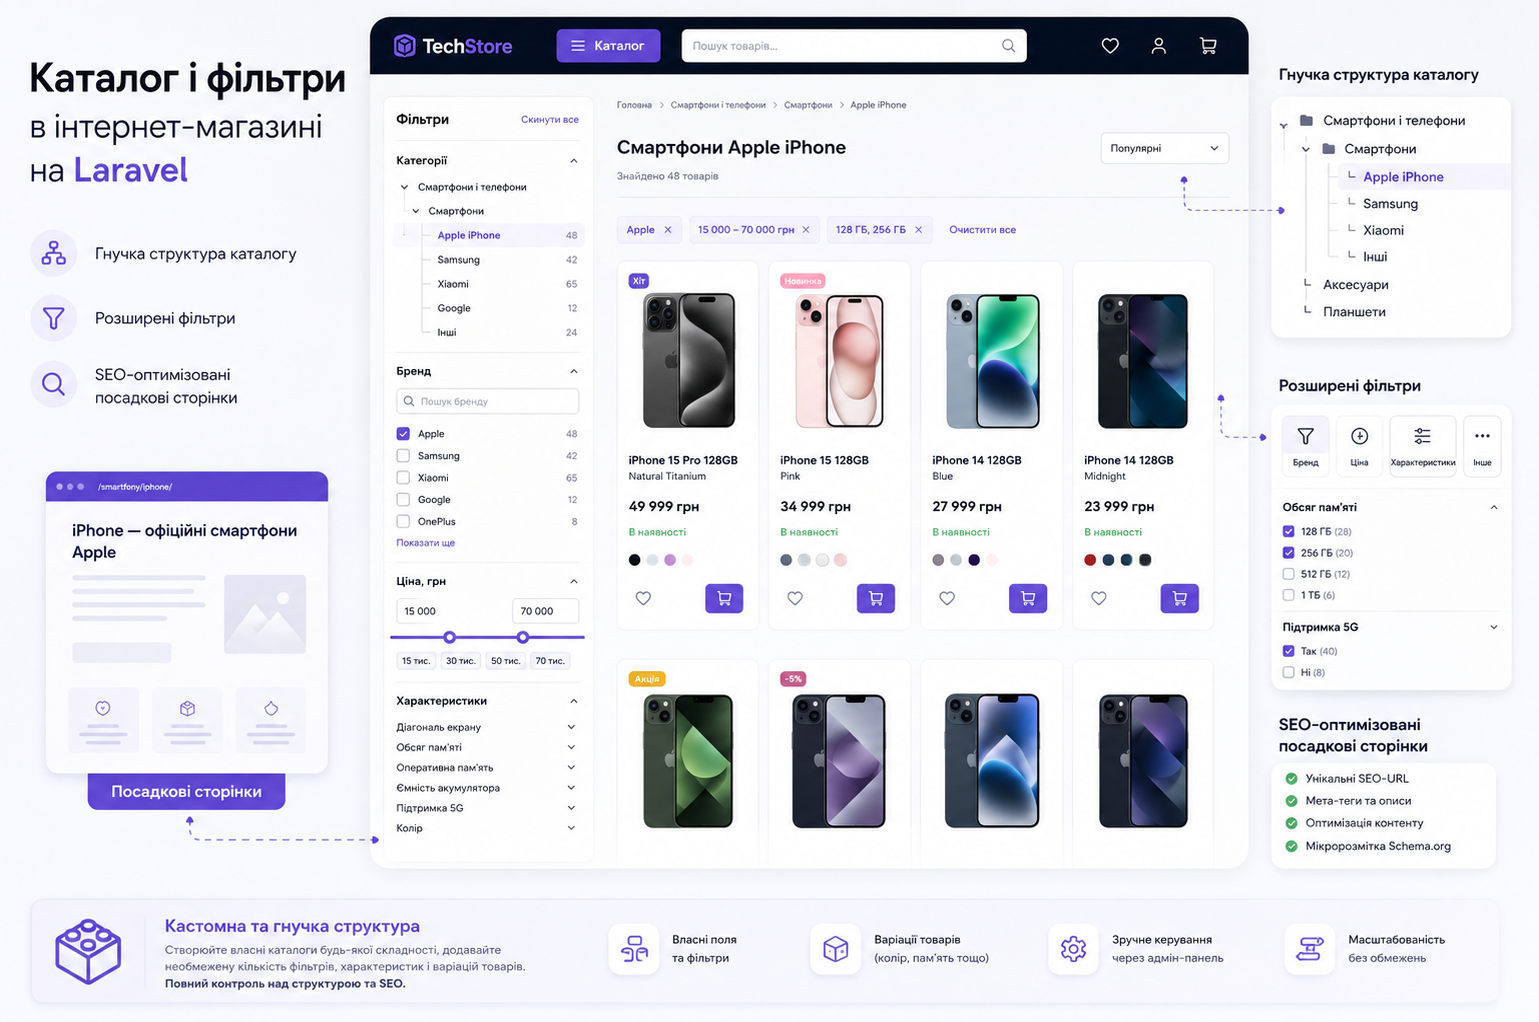
Catalog and filters in a Laravel online store
The catalog is one of the main reasons to choose Laravel for an online store. In a ready-made CMS, product structure often depends on module capabilities. With Laravel, the catalog can be designed around the real assortment: categories, brands, attributes, variations, filters, promotions, landing pages, and indexing rules.
For SEO, this is critical. If the catalog is not planned before development starts, the website may get duplicate pages, chaotic URLs, unnecessary indexable filters, or important categories without landing pages. These issues are very typical for ready-made CMS platforms and are difficult to fix after launch because they are already tied to the database, templates, routing, and sitemap.xml.
At SEO-Evolution, we design the catalog together with the SEO structure: we define which pages should be promoted in search, which filters remain user-only, how URLs are generated, and how internal linking helps distribute authority between categories, products, and informational pages.
Stages of Laravel online store development
Step-by-step Laravel website development begins with a technical specification. It should define requirements for structure, design, catalog, admin panel, payment, delivery, integrations, SEO, analytics, testing, and project acceptance. This helps understand the project scope before programming starts.
To prepare such a document, review our article about a technical specification for website and online store development . It explains which requirements should be described before handing the project over to development.
Below is a short structure of stages that is convenient for estimating a Laravel project and explaining the process of developing an online store from scratch.
| Stage | What is done |
| Task analysis | Business processes, products, audience, competitors, traffic sources, limitations, and website goals are studied |
| Store structure | The catalog, categories, filters, product page, cart, order placement, service pages, and URLs are designed |
| Prototype and design | Key user scenarios, interface logic, mobile version, and page design are prepared |
| Software logic and interface | Laravel website logic, admin panel, database, page templates, forms, cart, and order placement are developed |
| Integrations | CRM, payment, delivery, warehouse, analytics, advertising conversions, email or SMS services are connected |
| SEO and testing | Meta tags, sitemap.xml, robots.txt, canonical, schema.org, speed, forms, order placement, and GA4 events are checked |

Can you build a Laravel website yourself?
You can build a learning website on Laravel yourself. To do this, you need to understand PHP, databases, Laravel installation, Artisan commands, models, routes, controllers, and Blade templates. This is a normal path for a developer learning the framework.
With an online store, the situation is more complex. It is not enough to simply display a list of products on a page. You need to think through how the website stores data, how the customer places an order, how the manager works with it in the admin panel, how payment is connected, how stock levels are updated, how user data is protected, and how all this is tested before launch.
Self-development is suitable for learning or a small experiment. A commercial Laravel online store needs a team because fixing mistakes in architecture, security, SEO, or order processing can cost more than professional development from the start.
How much does a Laravel online store cost?
The cost of a Laravel online store depends not on the framework itself, but on the complexity of the project. A simple catalog with ordering and a large store with personalized prices, integrations, multilingual functionality, product import, and a complex admin panel require different amounts of work.
The price is most influenced by three things: store structure, the amount of custom functionality, and integration requirements. Design, SEO, performance, analytics, and testing should also be considered from the start because they affect not only the budget but also the quality of the launch.
To get a realistic estimate, prepare a project description, competitor examples, the desired page structure, a list of external services, and administration requirements. After that, the team can estimate not an abstract Laravel website, but a specific online store with a clear scope of work.

SEO-Evolution cases: Laravel and online stores
A portfolio helps understand whether the team has experience with similar tasks. For Laravel development, this matters because a complex online store needs not only design but also proper architecture, stable logic, integrations, SEO, and support.
The Samsonite project shows experience in long-term work with a major brand, where stability, technical development, interface, and website support over the years are important.
For Tataki , the SEO-Evolution team created a food delivery website from scratch. This is an example of a Laravel project where the order form, customer account, and service logic matter.
AttributeTime – an online store for branded watches and accessories with custom design and full development. This format is closer to cases where a business needs a custom online store rather than a standard storefront.
More examples are available in the SEO-Evolution portfolio . Review the cases before ordering a Laravel website or a turnkey online store.
When should you order a Laravel online store?
Ordering a Laravel online store makes sense when a business needs an individual solution, not a ready-made template. Laravel gives more freedom for growth: the website can be scaled, functionality can be expanded, new services can be connected, performance can be optimized, and convenient administration can be maintained without technical overload.
If you need online store development with a well-thought-out structure, SEO foundation, fast performance, and room for growth, contact SEO-Evolution. We will help assess the task, prepare the technical logic of the project, and choose a solution for real business goals.
FAQ about Laravel for an online store
Is Laravel a CMS or a framework?
Laravel is a framework, not a CMS. A CMS gives you a ready-made administration system, templates, and modules. Laravel provides a foundation for custom development, where the team designs the website structure, database, admin panel, functionality, integrations, and SEO capabilities.
Is Laravel suitable for an online store?
Laravel is suitable for an online store if the project has complex logic, a large catalog, integrations, customer accounts, non-standard order placement, or scalability requirements. For a simple store without complex tasks, a ready-made CMS can be considered.
Is Laravel good for SEO?
Laravel is good for SEO when SEO requirements are built into the website architecture. Clean URLs, meta tags, canonical, sitemap.xml, robots.txt, BreadcrumbList, Product schema, performance, mobile version, and control over filter indexing should be planned.
Which is better for an online store: Laravel or OpenCart?
OpenCart is suitable for a standard store with typical logic. Laravel is better for a custom online store that needs non-standard business processes, integrations, customer accounts, B2B functionality, scalability, and full control over architecture.
How much does a Laravel online store cost?
The price depends on the catalog, design, integrations, accounts, order placement, SEO requirements, product import, multilingual functionality, analytics, and support. An accurate estimate can be prepared after analyzing the structure, functionality, and technical specification.
Conclusion
Laravel is suitable for online stores that need a flexible technical foundation, clean code, fast performance, convenient administration, and the ability to grow without the limitations of a ready-made platform. It is not a universal answer for every store, but it is a strong solution for projects where the website must grow together with the business.
The main point is to evaluate not the framework itself, but the task the online store must solve. If a standard CMS limits sales logic, performance, catalog structure, or future improvements, Laravel gives more control over the website’s technical foundation.
SEO-Evolution helps businesses create websites and online stores with development, SEO, performance, analytics, and further support in mind. Review our services or portfolio to evaluate our approach to real projects.


